A Web host is the company that will house your Web site files and serve them to your readers.
The Web host I typically recommend to most small businesses is GoDaddy. Yes, there are a ton of complaints about them online, but for the vast majority of small businesses they’re just fine.
I’m going to jump right into the process of buying a hosting package from GoDaddy, but if you want to learn more about Web hosting providers I’ve written some additional articles here:
- What is a Web Hosting Provider?
Here, I go through exactly what a Web hosting provider is, the types of hosting companies out there, and why I recommend a managed hosting provider for small businesses. - Choosing a Managed Hosting Provider
Here, I’ll walk through my recommendations for managed hosting companies and explain why I recommend GoDaddy, Hostinger, and IONOS above others.
Introduction
By now, you should have your own domain name. The next step is to start building your Web site. Let’s get straight to it. If you have any questions along the way, feel I haven’t explained things properly, or feel my instructions are outdated or imprecise, please leave a comment.
1. Purchasing Managed Web Hosting on GoDaddy
This article is going to focus on people who choose GoDaddy (which is my #1 pick, albeit a begrudging one).
- Start out by going to GoDaddy. I’d appreciate if you could click this link (or any link on my site) to get there, as I’ll make a whopping seventeen bucks out of it. But no pressure :)
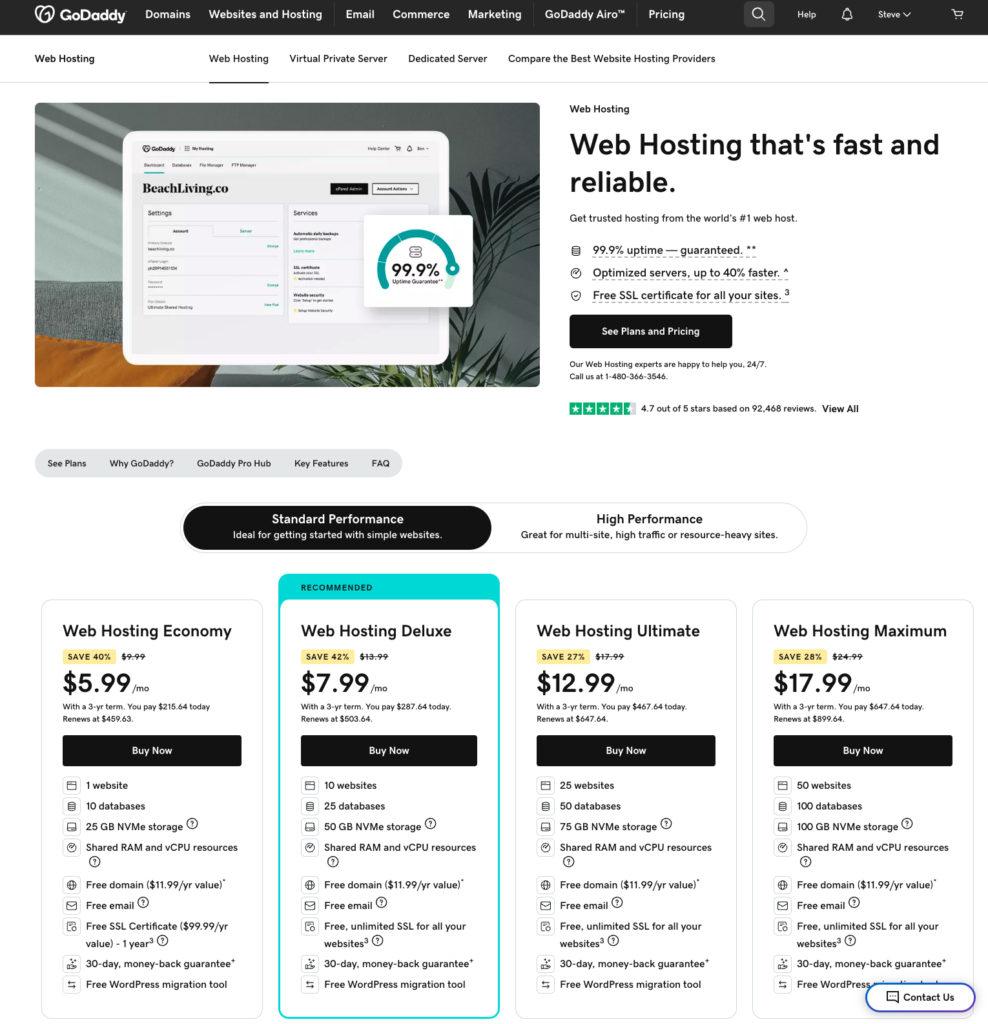
- There are a dizzying number of choices here.
For most small businesses I recommend Web Hosting Deluxe, which is their second cheapest plan.
My recommendation is to get the 36 Months plan, which for the Web Hosting Economy plan costs $287.64 for the first three years, and $167.88/year afterwards, which isn’t unreasonable. It offers perks like free SSL and room to grow.
If you’re not quite ready to spend all that money you can choose Web Hosting Economy for slightly less, but it’ll come with a few headaches as they try to nickel-and-dime you into buying stuff you can get at no additional cost with Web Hosting Deluxe.
Go ahead and click Buy Now under the plan you want.
- You’ll see a shopping cart to the right side of your screen.
You should see “Microsoft 365 Email Essentials Free Trial” in your Cart. My recommendation is to click the trash can icon to remove this from your Cart, unless 1) you like Microsoft and want to use their email service and/or 2) You want to get your bill in one place and don’t mind paying more.
As for me, my recommendation for your small business email will be Google. I’ll walk you through later on how to set this up (even though Microsoft Email is supposedly “free”, GoDaddy and Microsoft WILL automatically start billing you after three months for it if you don’t remove it now).
Be sure to select 12 Months or more. This entitles to to a free domain name (which you can transfer to a cheaper domain company later) and free SSL (which you keep as long as you stay with GoDaddy).
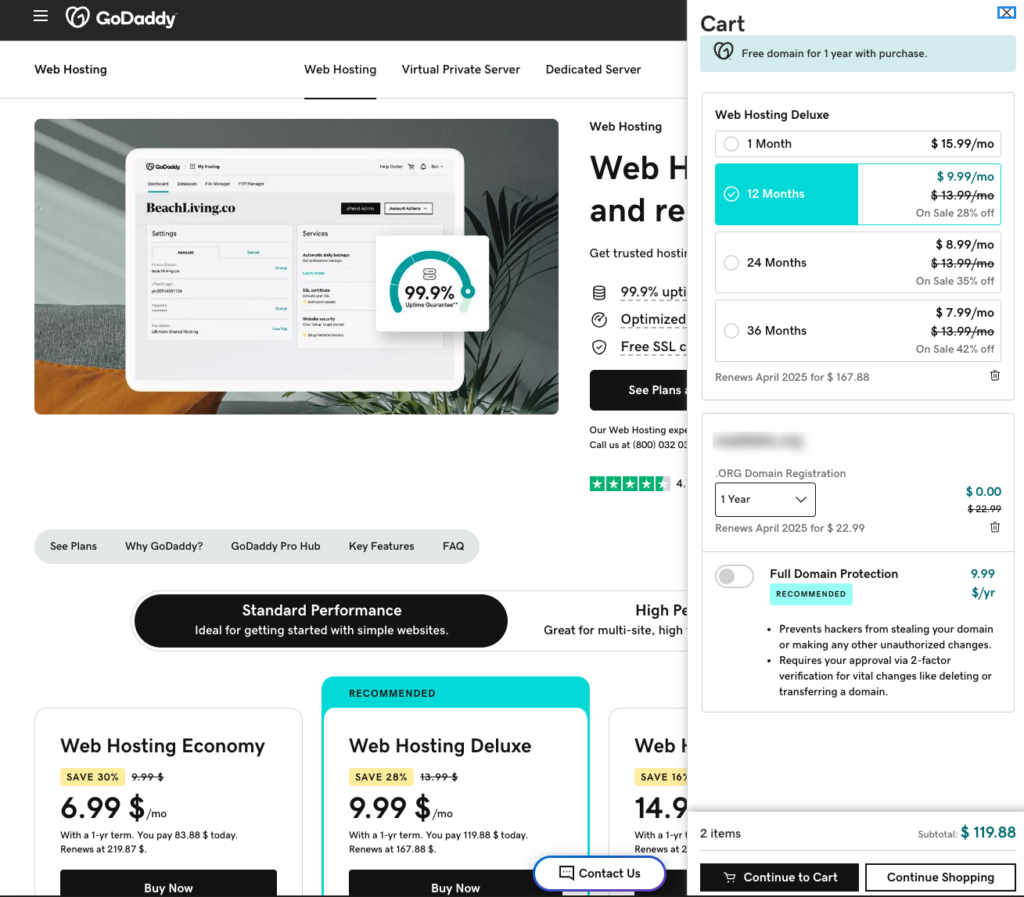
- This next step is important. In order to collect your free domain name, you need to add a domain name to your cart NOW. They do provide these instructions in the fine print, but they’re very easily missed (I’ve been a customer of theirs for over 20 years and even I was fooled).
The process of finding a domain name on GoDaddy is very similar to finding one on NameSilo, as I outlined in the previous step. Just enter the domain name you want and once you find one, click Make It Yours or Add to Cart.
If you already have a domain name, you can use this to register a domain for another name your business goes by, a new business idea you have, or you can just give it to a friend.
In your shopping cart, make sure to change the term of your registration to 1 Year and do not select Full Domain Protection. You should see the price zero out.
By the way, we’re going to claim our free domain name from GoDaddy now, but we’re going to transfer it to a much lower cost provider who gives you serves like “Full Domain Protection” at no additional cost. So the “Renews for $22.99” message you see will not apply. - Next, you’ll need to create an account with GoDaddy if you don’t have one already. You can use your Facebook or Google login to create your GoDaddy account, or your own email and password.
Any of the options are fine. I usually prefer using my own email and password. Enter your information and click “Create Account”. You might be sent an email with a verification code. Just get the code in your email and enter it where asked.
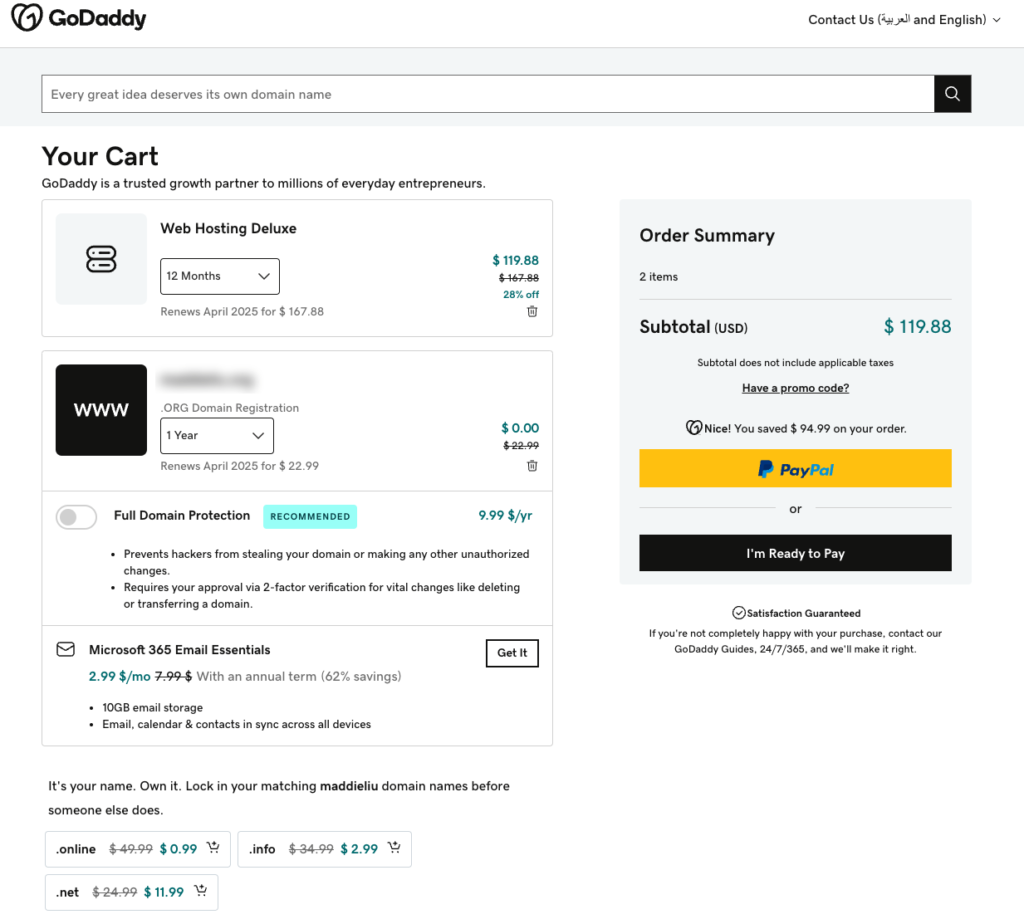
- Finally, you’ll get to your confirmation page.
This is where you’ll see a barrage of upsells as GoDaddy has you on the hook and will try to sell you a bunch of stuff you don’t need.
Ignore anything that it recommends, including “Full Domain Protection” and other domain names it suggests. If you see other offers on your screen you’re not sure about, let me know in the comments and I’ll be happy to let you know if they’re worth your money.
Double-check that you’ve removed Microsoft 365 Email Essentials. It’ll save you a lot of hassle a year from now.
Once you’re ready, click I’m Ready to Pay. GoDaddy used to be known for releasing a lot of promo codes, but if you go for the 36-month Web Hosting Economy or Deluxe, the price you see is the lowest you’ll get.
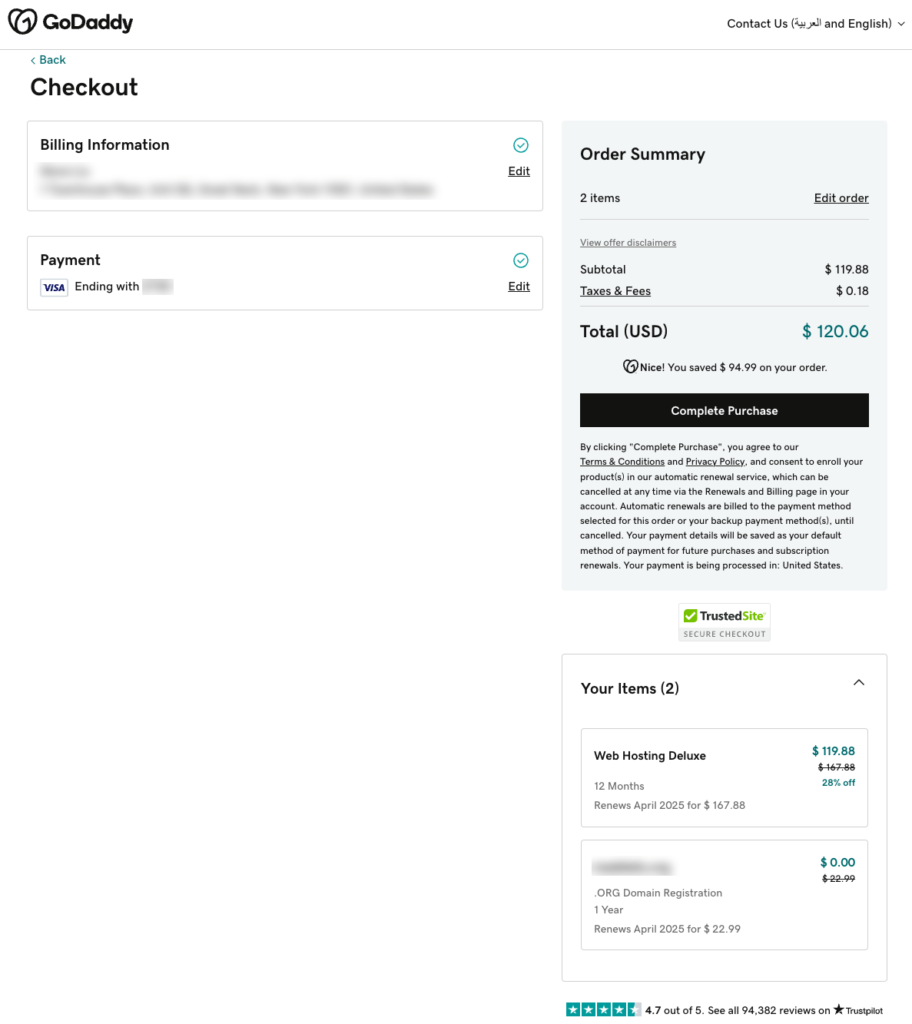
- On the final checkout screen, enter your billing information and payment information and confirm you’re getting exactly what you ordered, nothing less and most importantly when it comes to GoDaddy and most of these shared hosting providers, nothing more. There should be only two items in your cart: your hosting package and your free domain name.
Click Complete Purchase.
At long last you’ll see a confirmation page with your confirmation number. You’ll also get a receipt to your email Inbox. They’ll try to convince you on this page that you need more stuff. Just ignore it.
By now you should have the following:
- A Web hosting account with free SSL as long as you maintain the hosting with GoDaddy
- A free domain name.
2. Setting Up WordPress on GoDaddy
GoDaddy’s final confirmation screen says “Time for the Fun Part”. This is one of those rare cases where I agree 100% with them. Everything from here IS going to be fun. Trust me :)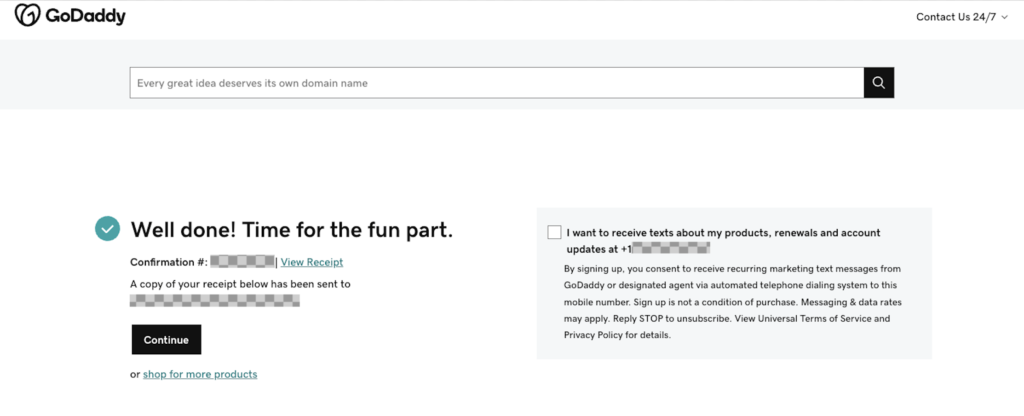
At this point you have access to your Web server, which similar to your computer allows you to upload and download files into directories.
Our next goal is to install WordPress. Normally, I’d talk you through a process where you go to wordpress.org, download the files, copy them onto your server, make a few configuration changes, and access WordPress.
These days, most companies save you all those steps by walking you through the process using a wizard where most of this stuff is done for you in the background. Here’s GoDaddy’s version.
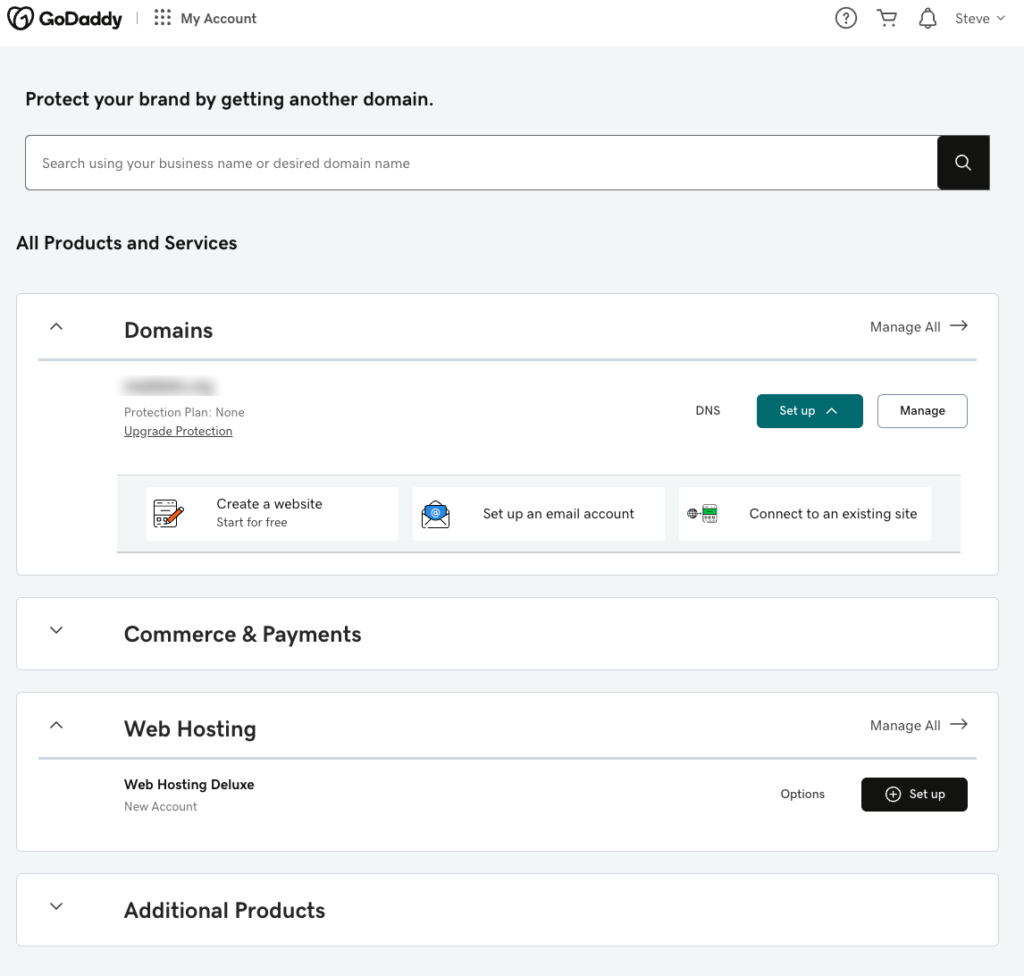
- The first step is to go to your email titled. Yourname, your order confirmation is inside. Open the email, verify that all the charges are as you expect, and click the Go to My Products button. Alternatively, you can go to straight to account.godaddy.com/products or go to the GoDaddy home page and click your name in the upper right-hand corner and choose My Products.
You’ll see what you just purchased, including your domain name and your Web Hosting package.
Ignore the Domains section for now. We’ll go back to that later.
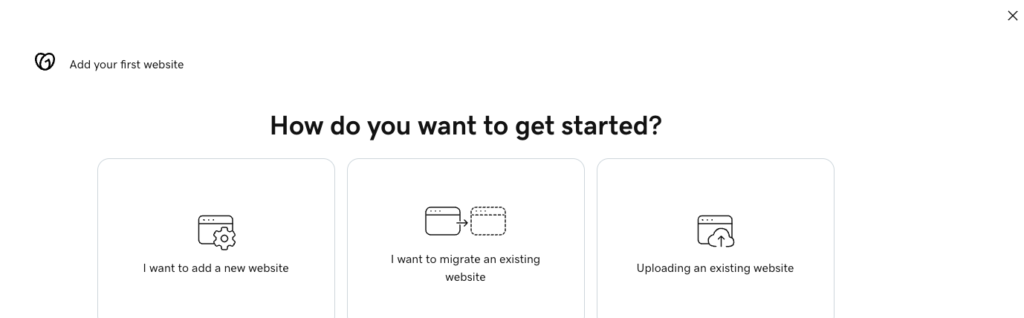
Scroll down to the Web Hosting area and click the Set up button. - GoDaddy will take you through its “wizard” to get you started. The first step will be called How do you want to get started? On this step, click I want to add a new website, even if you already have a Web site hosted elsewhere.
To explain, we’re going to set up a fresh installation of WordPress and a fresh new design (called a “Theme”) and moving over whatever content you already have manually, from from a technical perspective you will be setting up a “new Web site”. Don’t worry, once we have your new site set up, we’ll go through the process of contacting your old Web company or host to shut it down.
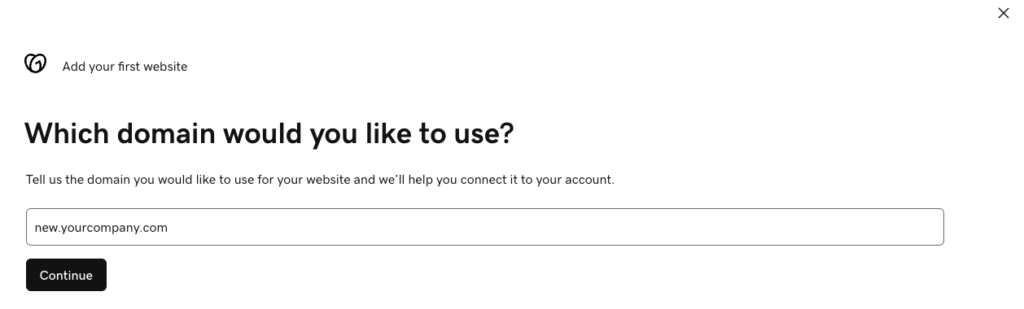
- The next step says Which domain would you like to use. There are a few ways you can go here.
- If you’re creating a brand new site on a brand new domain, enter your main domain name here, even if you haven’t registered it yet. This will likely be the free domain name you just got from GoDaddy (they’ll give you this option by default).
- If you’ll be replacing your main site that’s currently hosted on another Web server or Web hosting company, you’re going to want to keep your main domain pointed to your live site so your customers can continue to use your old site while you work on the new one.
If that’s the case, click Use a different domain and then in the box enter a subdomain off of your main domain.
For example, if your main domain is yourcompany.com, enter a subdomain like new.yourcompany.com here. We’ll build and test your site on this temporary subdomain, and then when you’re happy with the site we’ll move everything over to the new domain. Click Continue.
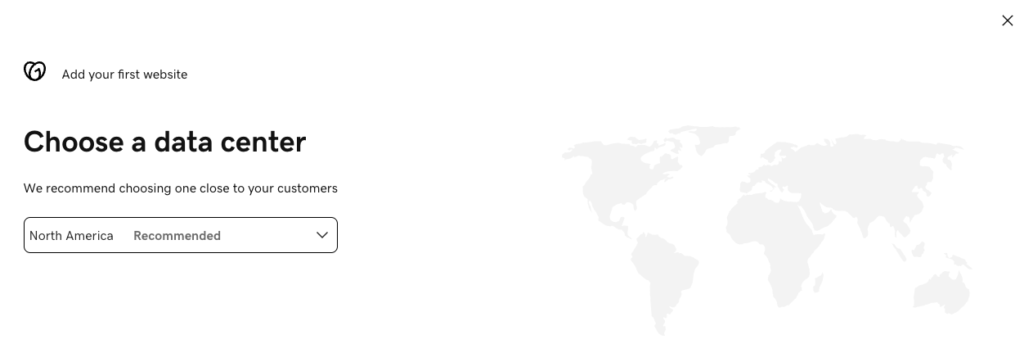
- The next step is to choose a data center. This is where the server that’s hosting your site will be located. You’ll want to choose the one closest to where your customers will be, as this will provide them the fastest experience.
For most of people reading this, this will be North America. Click Continue.
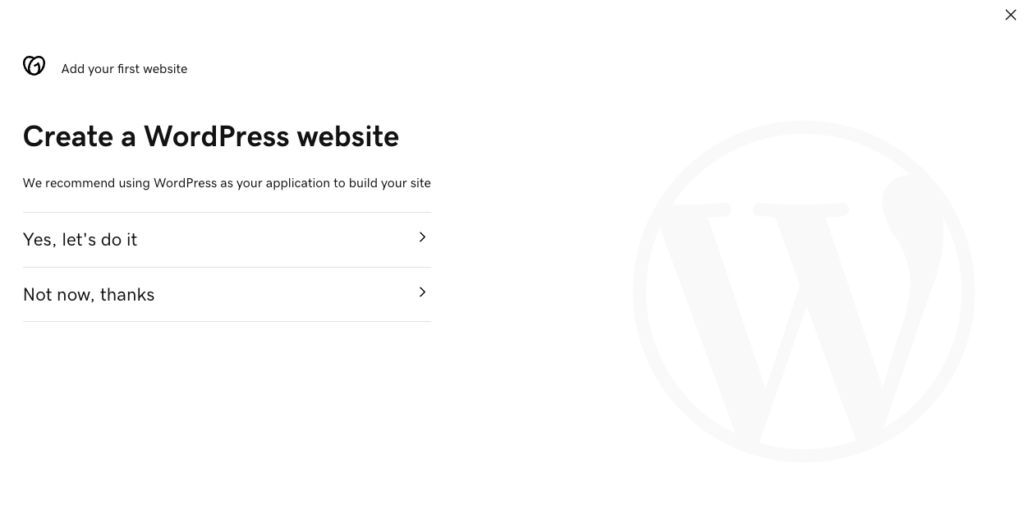
- The next option will be to Create a WordPress website. Click Yes, let’s do it.
WordPress is what’s called a Content Management System, or CMS. It’s essentially an application that sits on your Web server that allows you to create Web sites, just as an application like Microsoft Word allows you to create documents. There are many options of CMSes to use, but WordPress is by far the most popular and the most accessible, which means it’ll be around for years to come.
FYI, the normal process to set up WordPress is the following:
1) Copy all the WordPress application files onto your server
2) Set up a database
3) Edit a text file on your WordPress site that points to the database
4) Start using WordPress
GoDaddy simplifies the experience by doing this for you behind the scenes. I always suggest to learn the manual process yourself—going through this process manually will open a LOT of options to you in case you ever want to leave your current hosting provider and move to another one. In a future post I’ll walk you through exactly how.
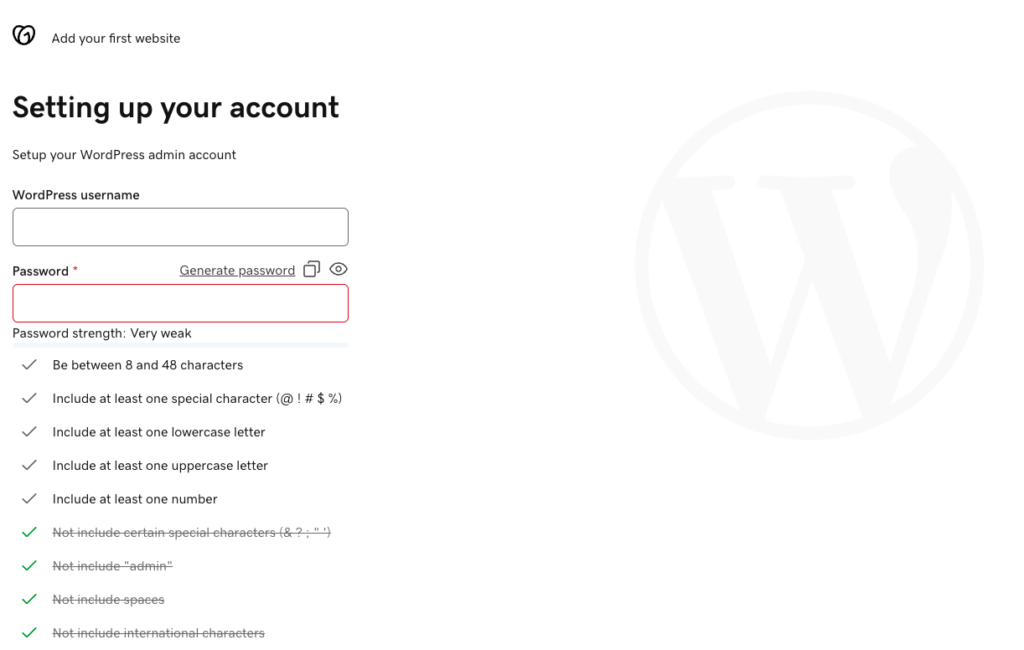
- The next screen will be Setting up your account. You’ll be asked to create a username and password for your WordPress admin account. To be clear, this is separate from the GoDaddy admin username and password we created above (although for simplicity you can always set them to be the same).
As we go through all the steps, you may be creating a lot of different usernames and passwords. I’d suggest keeping a spreadsheet open so you can keep track of what’s what.
In this case, this will be the username you use to log into WordPress to create and update your site. Because this is the name that will be showing as the author for blog posts (if you choose to create a blog), I’d suggest a name that represents you or your business, such as your first name, your professional name, or the name of your company.
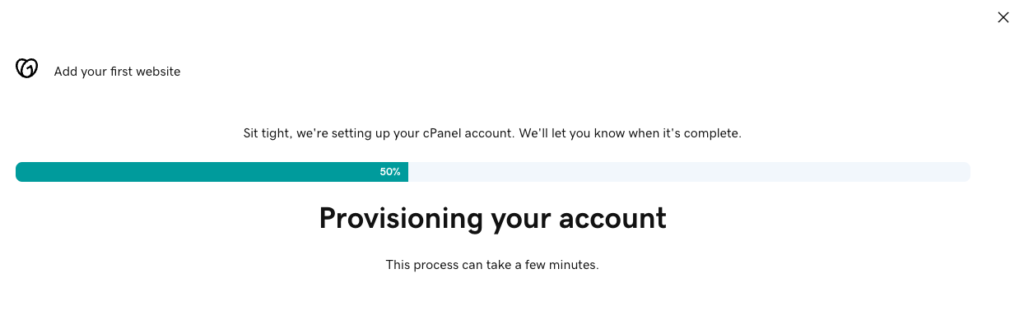
- Finally, we’ll get to the point where GoDaddy sets up your account. This should take only a minute or two.
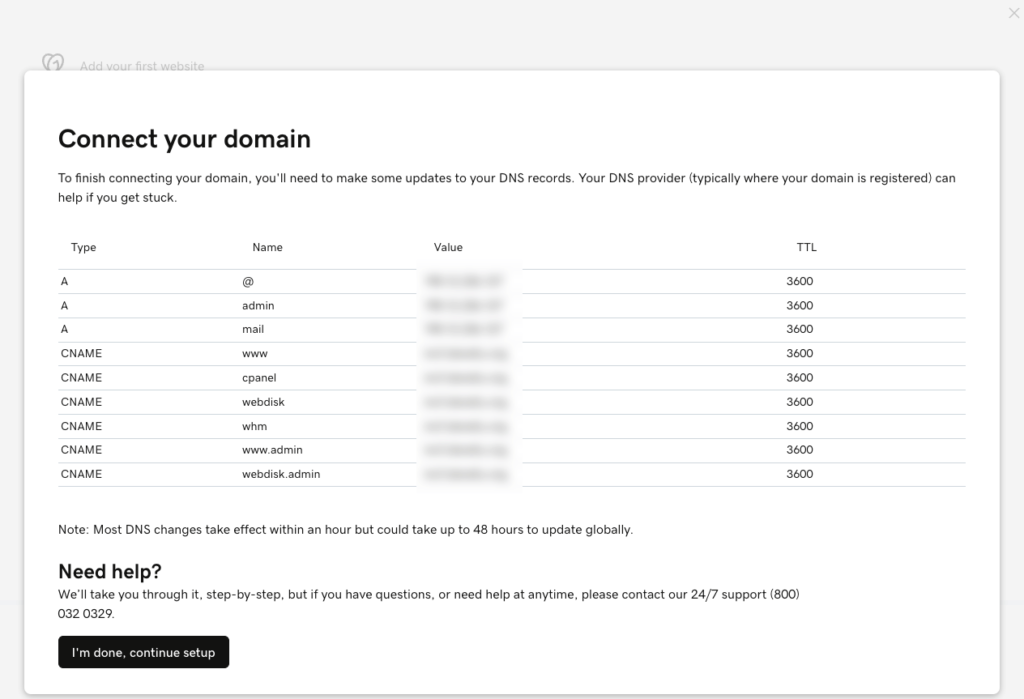
When everything is finished you’ll see a screen that says Connect your domain with a lot of gobbledygook on it. Make sure to take a screenshot, as this will be very important for the next step.
3. Pointing Your Domain Name
If you chose to use the free domain from GoDaddy as your main domain and selected it back in Step 3 of the last section (Setting Up Your Hosting Account on GoDaddy), you’re all set with this part. You can move on to the next post.
If your domain is hosted outside of GoDaddy, you’re going to have to make changes to your DNS server to point your domain name to GoDaddy’s Web servers.
Just to get the terminology out of the way, there are two types of domain names that we’ll be working with (you can refer back to my original post on domain names for more details).
- Your root domain name (yourcompany.com)
- The subdomain that begins with www (www.yourcompany.com)
It’s really your preference as to whether you wish your Web site to be known by its root domain or with www in front of it. In either case, we’ll set things up so that your customers (and Google) both get to your Web site.
I’ve mentioned that my domain name company of choice is NameSilo. I’ll be using them as an example, but if you use another domain name provider the concepts are going to be very similar.
Basically what we’ll be doing is going into the DNS server (DNS stands for “domain name service”) that our domain hosting company (in my case, NameSilo) maintains and instructing it to point the domain name to your Web site, hosted at your Web hosting company (in my case, GoDaddy).
- Log into NameSilo (or whatever your domain name provider is)
- Find the part of the site where you manage your domains. In the case of NameSilo, it’s the link on the top of the screen once you’ve logged in called Manage My Domains.

- Click the blue globe in the Options section next to the domain you want to point to your Web site.
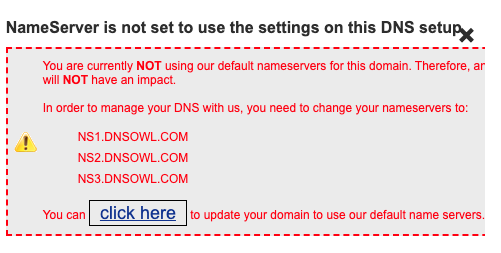
The “NameServer” column tells me where the DNS servers for each domain is located. As you can see here, four of my domains are at the DNS server at domaincontrol.com (which is owned by GoDaddy; these domains were once hosted at GoDaddy and even after transferring them to NameSilo I never bothered to change them) and one domain is at the DNS server at dnsowl.com (which is owned by NameSilo).
It gets a little confusing because even though I transferred all my domain names to NameSilo, GoDaddy allows me to continue to use their DNS servers since I have a hosting account with them. Generally speaking, though, it’s a good idea to move your DNS records to the DNS server owned by your domain registrar. That makes it simpler in case you ever change Web hosting providers.
The important step here is to make sure that the domain name you want to manage is using the DNS servers where you have your domain. In my case, I need to double-check that my domains are on NameSilo’s DNS servers. Conveniently, if they’re not NameSilo will ask me if I want to switch them.
- You’ll come to a screen called Manage DNS. This is where you’ll be taking the information from GoDaddy’s screenshot and typing it into NameSilo. Here’s a refresher on what that looks like.
- Here’s a crash course in what DNS servers are and how to configure them.
The purpose of a DNS server is to essentially “translate” a domain name into an IP address.
When you type a Web address into your browser or send an email to a domain name, the browser or e-mail application doesn’t know where to send the traffic by its name only. The request will first go through a DNS server to figure out the computer that the domain name is pointing to.
DNS records are a bit of a mystery at first, but make sense as you learn what they do.
- The Record Type (also called “Type” or “Resource Record Type”) represents the kind of request the DNS server will be handling. Generally speaking you’ll be dealing with three record types:
- An A Record points a domain name to an IP address. The “A” stands for “address”.
- A CNAME record points a domain name to another domain name. For example, if you already have an A record pointing yourcompany.com to 123.4.5.6, you can set a CNAME to point www.yourcompany.com to yourcompany.com and both will resolve to 123.4.5.6.
- MX records have to do with e-mail. We’ll cover those later.
- The Name field refers to the subdomain you’ll be working with.
- When you see @ in the Name field, it’s referring to the root domain (e.g. yourcompany.com without any prefixes)
- GoDaddy went a little overboard here—they suggest that you create subdomains for admin.yourcompany.com, mail.yourcompany.com, cpanel.yourcompany.com, webdisk.yourcompany.com, whm.yourcompany.com, www.admin.yourcompany.com, and webdisk.admin.yourcompany.com.
- There are only two records in GoDaddy’s screen that you will need to be concerned with in the long run:
- The A record for @ (which IP address your root domain points to)
- The CNAME record for www (making sure your www subdomain points to the same IP address as the root domain).
- The Value field is simply the hostname or IP address that is being “pointed to”.
- The TTL value (TTL stands for “time to live”) is a the number of seconds that’s used to determine how long to store (cache) your information when different DNS servers communicate with each other. Most companies default this to 3600 seconds (1 hour), which is a good number to use.
- The Record Type (also called “Type” or “Resource Record Type”) represents the kind of request the DNS server will be handling. Generally speaking you’ll be dealing with three record types:
- As far as what to enter in the DNS records, you’ll have one of two scenarios. In both cases you’ll be
- Scenario 1: If you’re building a brand new site on a brand new domain, we can go ahead and use GoDaddy’s recommendations. If these values already exist, go ahead and overwrite them.
Again, ignore all the subdomains it tells you to create—you should have one A record and one CNAME record.- A Record
- Hostname: @
- Address/Value: Copy it from the GoDaddy screenshot
- TTL: 3600
- CNAME Record
- Hostname: www
- Address/Value: enter your root domain name, e.g. yourcompany.com
- TTL: 3600
- A Record
- Scenario 2: Remember that if you already have a Web site with live traffic, we do NOT want to point your main domain OR your www subdomain to your new Web server just yet. This way your customers can still go to your old site while we build your new site. After our site is done and we’re happy with it, we’ll switch everything to the proper domain.
- There should already be an A record pointing to your current Web host’s IP address, and a CNAME record pointing to your root domain. Leave those as-is for now.
- Here’s the only record you should have
- CNAME Record
- Hostname: new (or whatever subdomain you’d like to use
- Address/Value: Copy the IP address that GoDadddy listed for @
- TTL: 3600
- CNAME Record
- Assuming you’re using NameSilo, in both scenarios you can click the appropriate record under Select the resource record type you want to create under Add/Edit a Resource Record. Your entry will looks something like this.
- Scenario 1: If you’re building a brand new site on a brand new domain, we can go ahead and use GoDaddy’s recommendations. If these values already exist, go ahead and overwrite them.
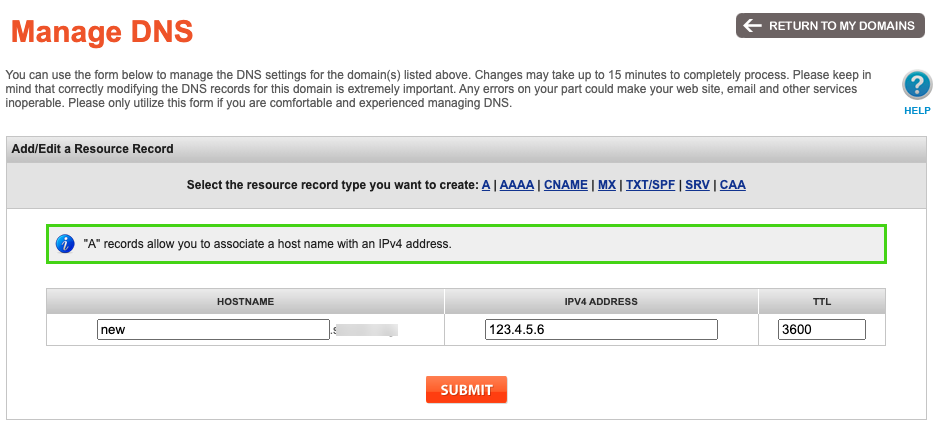
Once you click submit, you should get a confirmation that the record has been added. Note that it may take anywhere from 15 minutes to 48 hours for your domain to be resolving throughout the Internet due to the way DNS works.
If for some reason you lost the screenshot, you can find your server’s IP address on GoDaddy’s hosting page. This is what goes into the A record.
Checking on your DNS
If all goes well, if you type in your domain or subdomain, you should see something like this. It’s the sample site that WordPress displays by default. Don’t worry, we’ll fix it up.
<

If you get a message like “This site can’t be reached”, it probably means that your DNS settings haven’t propagated yet or that there may have been a typo in your settings. Go to this site, type in your domain or subdomain, and ensure that “A” record is selected. You should see the IP address you entered appearing for all 25+ DNS servers that site lists from around the world.
If the correct IP address is only showing up for some of the DNS servers but not others, it means your changes are still being spread around the world. If an incorrect IP address is showing up, it means
Next Steps
By now, you should have a domain name, a hosting account, and either your main domain or a subdomain pointed to your hosting account.
Next, we’ll start using WordPress!
